A component is one building block of a catalog item. Basically, it is a configuration script that is run inside a new Workspace in order to configure it.
See the section Catalog Introduction to see what the different concepts of catalog items mean (component, catalog item, subscription).
Login to the Research Cloud portal.
When you are a developer-member in one of your collaborations (COs) you will see a downward arrow next to the "Catalog" tab.
(If you are not a developer, yet, see the Working together section for more information on that.)

Clicking on this arrow renders a drop-down list:

You can choose to activate the conventional "Catalog" tab, but you can also choose to view and edit components and catalog items.
If you select "Components" you will be presented with a list of components that are available to you.
"Available" means that you are a member of a CO, that either is allowed to use a particular component or is the owner of it.
The components you are one of the owners of will be shown with extra options: "edit", "disable" and "delete".

But let's assume that you do not "own" any components, yet.
(More precisely: "None of the COs you are a developer in owns any components.")
Being a developer in a CO, you can create a new component for that CO.
Click on the "+" symbol in the upper right of the page:

Clicking the "+" starts the "Add component" wizard:
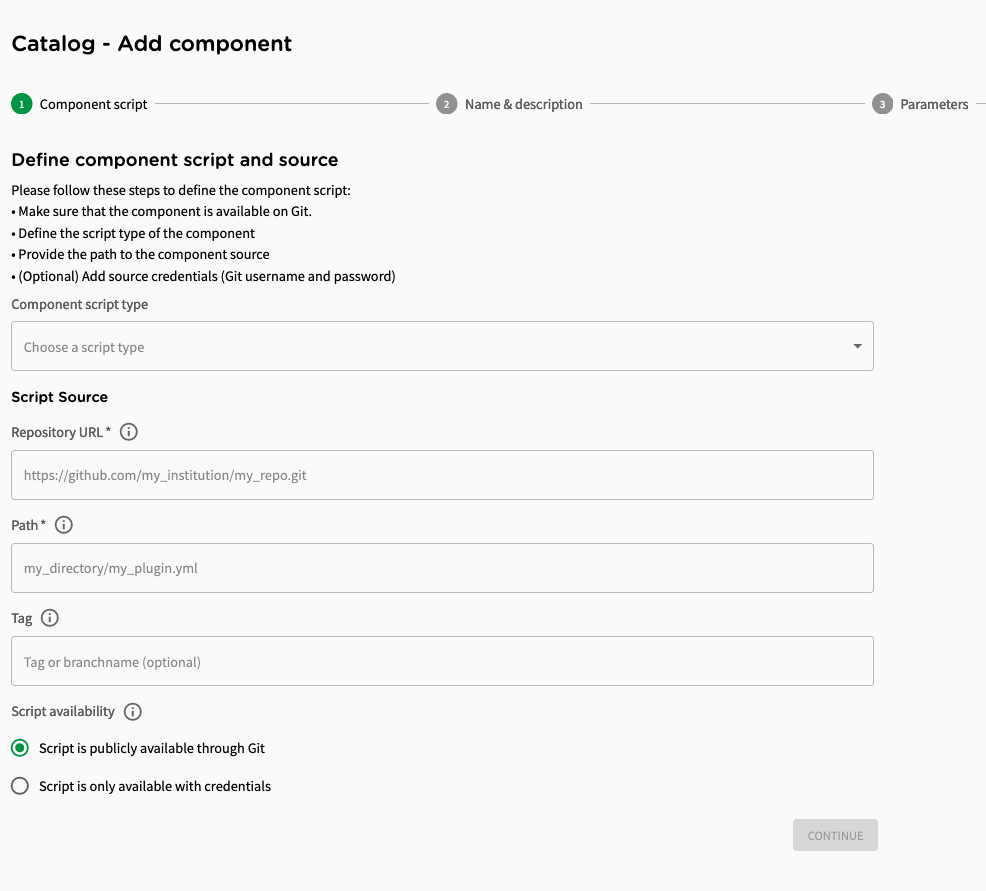
Step 1: Define component script and source
In the first step of the component wizard, the following fields must be filled in:
Component script type
The possible values are
Ansible Playbook (usually used in Research Cloud to configure Linux workspaces)
Powershell (used to configure Windows workspaces)
Docker (the component just "wraps" a dockerfile)
Docker Compose (the component wraps a docker-compose configuration)
Script Source
Url repository
The url of the git repository from where Research Cloud can retrieve the script. This is the url that would also be used for cloning the repository in "http" mode.
Example: "https://github.com/my-repository.git"
(this is the string you get when using the clone-button in the repository's web-UI, with the "https" option)
The repository must be accessible through the internet. Services like gitlab, github, bitbucket ... will all work .
The repository can still be private , if you wish (also see "Script availability").
Path
The path to the (main) script file. This should specify the exact location of the file "down" from the repository url.
Example: "my-research-cloud/components/my-new-component.yml"
Tag
Can be the name of a tag or the name of a branch of the given repository.
Script availability
Usually, Research Cloud users have no objections to put their scripts in a public repository. A repository that can be viewed and cloned by anyone. A repository is no place for credentials and secrets, anyway.
The option "Script is publicly available on Git" is thus a good default.
If for some reason you want to use a private repository you can choose
Fixed credentials (leaving the username and password in the Research Cloud backend)
CO secret credentials (referring to the username and password that you put into the "CO secrets" of the collaboration). Research Cloud uses Hashicorp Vault to store the secrets safely.
Continue
When this step of the wizard is complete you can proceed with the "continue"-button.
Step 2: Name and describe your component
Name, subtitle, description
In this step, give a clear and descriptive name and subtitle to your component. The description is a good place for the technical prerequisites and other details about the component. For others and for yourself.
Icon
Uploading an image for an icon helps a lot to identify and find your component. You can provide a variety of image formats, max. 100KB, displayed with 40 or 32px.
Step 3: Define component parameters
Your script might need variables that should be specified by catalog items that use the component or by the workspace-user who starts a workspace. This is the place to explicitly require the parameters and to give default values, if necessary.
For more details on parameters also see https://servicedesk.surf.nl/wiki/x/VQEQAQ
Step 4: Define owner and support
Component owner CO
You can choose from the collaborations that you are a developer in.
(see also https://servicedesk.surf.nl/wiki/x/IgAQAQ)
Choose the collaboration that will use the component to be its "home-collaboration".
Support url
Specify where users and developer-colleagues can find information and support.
Support name
The name of a person (or a team) that can help.
Support e-mail address
An e-mail address to send questions and requests to.
Step 5: Choose organizations that can use the component
Choose whether your component should be available for anyone on Research Cloud or just for members of particular collaborations.
Submit
When you have filled in all steps of the wizard you can have the component created by clicking the "Submit"-button.
"RSC-External"
When using your own component in a catalog item or when using any other component that is not authored by SURF, also use the "SRC-External" component:
list the "SRC-External" component before any of the "non-SURF" components are listed.