This article explains what two-factor authentication is, and the process for enabling it for use on the Data Archive. The SURF Data Archive currently does not have 2FA automatically enabled, but it is likely that 2FA will become mandatory for end-users in the near future. For now, it is optional, but it can be enabled on the level of user groups.
Please contact the SURF service desk if you would like to have it enabled, and please follow the steps below which are required to configure your authentication in the service.
About two-factor authentication
SURF compute and storage facilities will move away from using only the traditional username + password combination for authentication, in favour of stronger procedures such as certificate-based identities and two-factor authentication (2FA). 2FA (or MFA) in itself is a stronger mode of authentication, since, in addition to your password, you need to have something else — a ‘second factor’ — to prove your identity.
Setting up 2FA on the Data Archive
If you would like to enable 2FA on your user group, contact the SURF service desk to request this. The following sections explain the configuration you need to do on your side to use 2FA.
to use
the token. When2FA
is enforced on a set of logins while some of the users have no valid token yet, or do not understand how to use it, those users are effectively locked out until they are able to use their token.
Configuring a Time-based One-Time Password (TOTP): A particular 2FA protocol
You will also need to set up a TOTP protocol.
TOTP is a well understood and well-documented protocol (see: RFC6238, and also Wikipedia).
It uses the current time as an input to generate a 6-digit code that is unique and that is valid only for a very limited span of time after being generated (about 30 seconds). At each login you demonstrate proof of possession of the particular token that has been associated with your login name by responding with the 6-digit code that the token has generated for the current time interval.
Installing a TOTP client application
A TOTP token is a so-called software token. To possess a TOTP software token you need a TOTP compliant client application that can be installed and run on the operating system platform(s) of your preference, in which you can safely store a token identity that was created for you by a TOTP server.
The following list provides a number of locations where TOTP client applications can be downloaded. More client applications exist, there are quite a few to choose from. In principle any TOTP client should work well, but the list below only contains the clients that have been tested by SURF (October 2019), and verified to work well. There is at least one SURF tested client for each of the following platforms: IOS, Android, MacOS, Linux, and Windows.
TOTP clients for IOS
- https://apps.apple.com/gb/app/privacyidea-authenticator/id1445401301
- https://apps.apple.com/us/app/otp-auth/id659877384
TOTP client for Android
TOTP client for MacOS
TOTP client for Linux
TOTP clients for Windows
| Warning |
|---|
Make sure you have at least one TOTP client installed and ready to be used on your phone or computer. Once a token identity is generated and presented to you (see below), it is associated with the loginname with which you entered the 2FA portal. You are expected to safely store and subsequently use it. You will no longer be able to login to the 2FA portal on the basis of username + password only. |
Creating a token at the 2FA portal
To create a usable software token you must obtain a token identity associated with your login from our 2FA portal, and safely store the identifier in the TOTP compliant app of your choice. This section explains in a few illustrated steps how to do just that.
- Step 1:
To obtain the identity for your token, go to the specialised 2FA portal. Since you have no usable token yet, you must login with the login name you want activate 2FA for, and its corresponding password.
- Step 2:
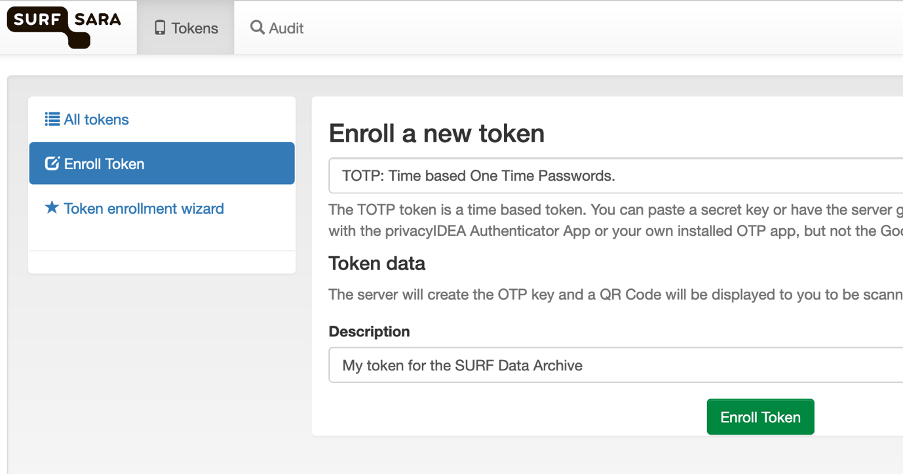
Once logged in to the portal, you are presented with a dialogue, as shown in the figure below, that has only one option, viz. to ‘enroll’ a new token. In this dialogue, click the green button to proceed.
- Step 3:
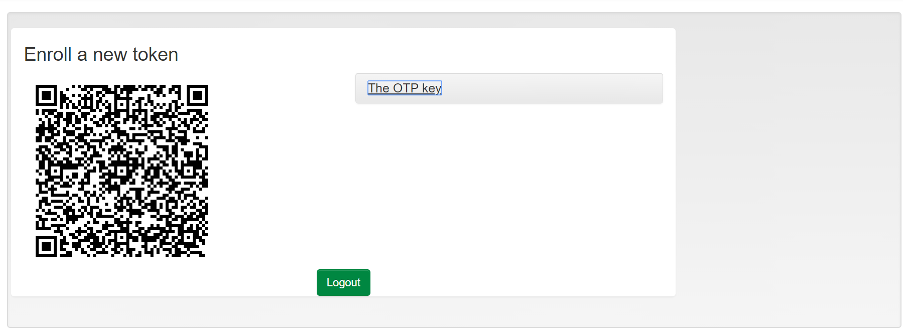
When you see a dialogue, similar to the one shown in the figure below, a token identity has been generated for you. It is presented to you, visualised as a QR code, and you must store the token identity in one or more of your TOTP client apps.
| Warning |
|---|
| N.B.: DO NOT PRESS THE LOGOUT BUTTON BEFORE SAFELY STORING YOUR TOKEN IDENTITY WITH AT LEAST ONE OF YOUR TOTP APPS! |
Once a token has been generated for you, you are required to use it for authentication, and you will no longer be able to get into the portal based on just your username + password only. Once a token identity has been associated with your login and you cannot use it you will need the help of SURF to delete the association of your login with that token identity.
- Step 4:
Store the token identity in your app. It depends on your app how to do that:
- A Phone-based app will let you scan the QR code;
- A number of apps will also settle for text of the URL of the QR code image;
- You can also click ‘The OTP key’. This presents a drop-down box similar to the one shown in the figure below, which display a "Base32 encoded key" that you can store in text-based token apps.

An example of entering a token indenty in a text-based app
WinAuth is an example of a TOTP client app for windows computers. Instead of scanning the QR code image, you must use the Base32 code, shown in the figure above, and enter it as the ‘Secret Code for your authenticator’ in the WinAuth dialogue shown in the figure below. Make sure that the app knows the codes are generated time-based rather than counter-based.
Guard your token identity well!
Note that your token identity, in all its possible representations — QR code image, QR code image URL, Base32 string — is a shared secret between you and the TOTP server. Therefore, do not expose such representations of your active, valid tokens. A malicious person who steals your shared secret can generate new, valid TOTP values at will. When your token is compromised, you should create a new one at the portal and delete the old one - see '2FA Portal revisited: managing your token(s)’.
| Warning |
|---|
| If you have completely lost possession of your token, you will not be able to manage your token and must contact SURF for assistance. |
Managing your token(s) in the 2FA portal
When you login to the portal with a login that has on or more associated tokens will find an overview of your token(s) under the ‘Tokens’ tab, similar to the overview shown in the figure below.
By clicking on the underlined token name in the left column, you can access a more detailed view shown in the figure below. In the top right corner of the token details overview, you see a red button that can be used to delete the token. You must delete a token that is in whatever way was compromised and enroll a new token and store its identifier in you app(s).
Note that there is also an audit tab, which gives you access to the log token activity.

Additional steps for Snellius users: Setting up an SSH key-pair for authentication
2FA requires SSH public key authentication on Snellius. Acquiring a public key can be done by generating a public-private key-pair and uploading the public key to our servers. To generate a public-private key-pair follow the steps listed below.
Creating and using an SSH key-pair
Windows
- Windows + MobaXterm users, you can create the SSH keys following this how-to: Creating an SSH keypair with MobaXterm
Linux / Mac
- Create a key-pair on your local workstation, by issuing the following command:
| Code Block |
|---|
ssh-keygen -t ed25519 -f .ssh/mykeyname |
The flag -t specifies the encryption algorithm, if left blank it will use RSA instead.
The flag -t sets the name and path of the output key-pair. We suggest setting it to something meaningful, like your username. In the case above, you would get the following pair of keys:
Private key |
| this is for your private use only. Keep it safe in |
Public Key |
| this is the key you will use for all types of key exchanges, including with our systems |
| Info |
|---|
| We strongly advise you to guard your private key with a passphrase! If you do not set a passphrase on the private key-pair, anyone that can steal your private key can authenticate anywhere you have registered the public key. |
| Warning |
|---|
| Enter a sentence you can easily remember for the passphrase question, this secures the private key. |
Please complete these steps before moving onto the next step.
Adding your key
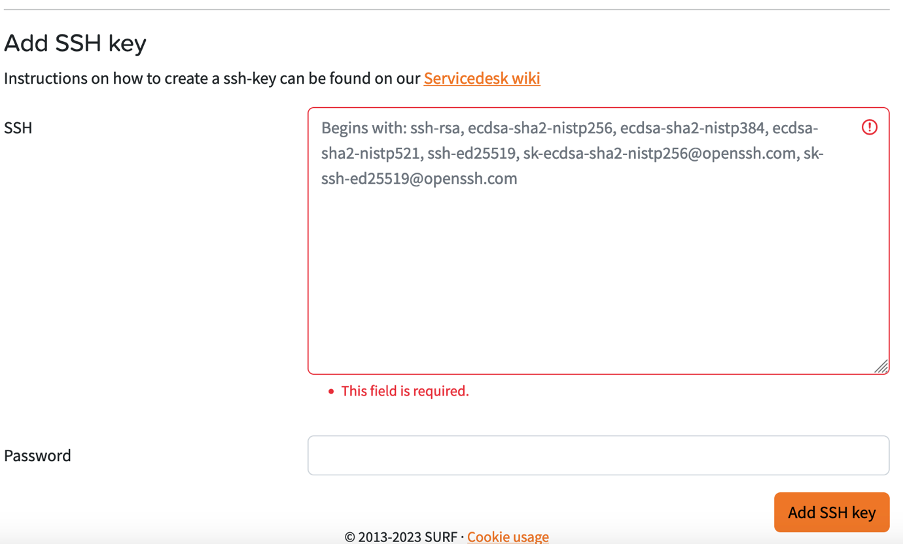
Next, upload your key on the CUA USER PORTAL under the “SSH Keys” menu.
- Add your key to the SSH field
- Add your CUA password in the Password field
- Select “Add SSH key”
Note: It might take few minutes between adding a new public key on the portal and that key working on the HPC system.
You should then be able to log in from your workstation to the Data Archive using the passphrase set on the key-pair.
Table of contents
| Table of Contents | ||
|---|---|---|
|