A catalog item combines a number of components in order to create a pre-configured turn-key workspace for a collaboration.
See the section Catalog Introduction to learn the difference between component and catalog item.
Login to the Research Cloud portal.
When you are a developer-member in one of your collaborations you will see a tab "Development" next to the "Catalog" tab.
(If you are not a developer, yet, see the Working Together section for more information on that.)

Clicking on this tab renders a drop-down list:

You can view and edit the different catalog items and components.
If you want to create a new catalog item, click on “Catalog items”.
Your browser will show a list of the catalog items that are available to you. "Available" means that either you are a member of a collaboration that is allowed to use a particular catalog item or that you are a member of a collaboration that "owns" a catalog item.
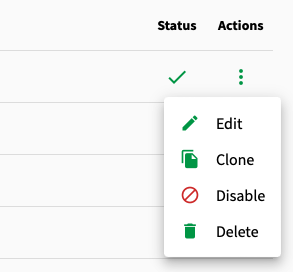
If you are one of the owners of a catalog item, it will be shown with extra actions: "edit", “clone”, "disable" and "delete".
But let's assume that you do not "own" any catalog items yet.
(More precisely: "None of the collaborations you are a developer in owns any catalog items.”)
Being a developer in a collaboration means that you can create a new catalog item for that collaboration.
Click on the "+" symbol in the upper right corner of the page:

Clicking the "+" starts the "Add catalog item" wizard:

Step 1: Select and order components
This is where you can compose the catalog item. In the lower part of the page, all available components are shown. You can select the components that will comprise your catalog item.
Each component represents a script that adds to or changes the configuration of the workspace.
When a workspace for this catalog item is started, the components will be run in the order you specify here. You can arrange the order by drag and drop.
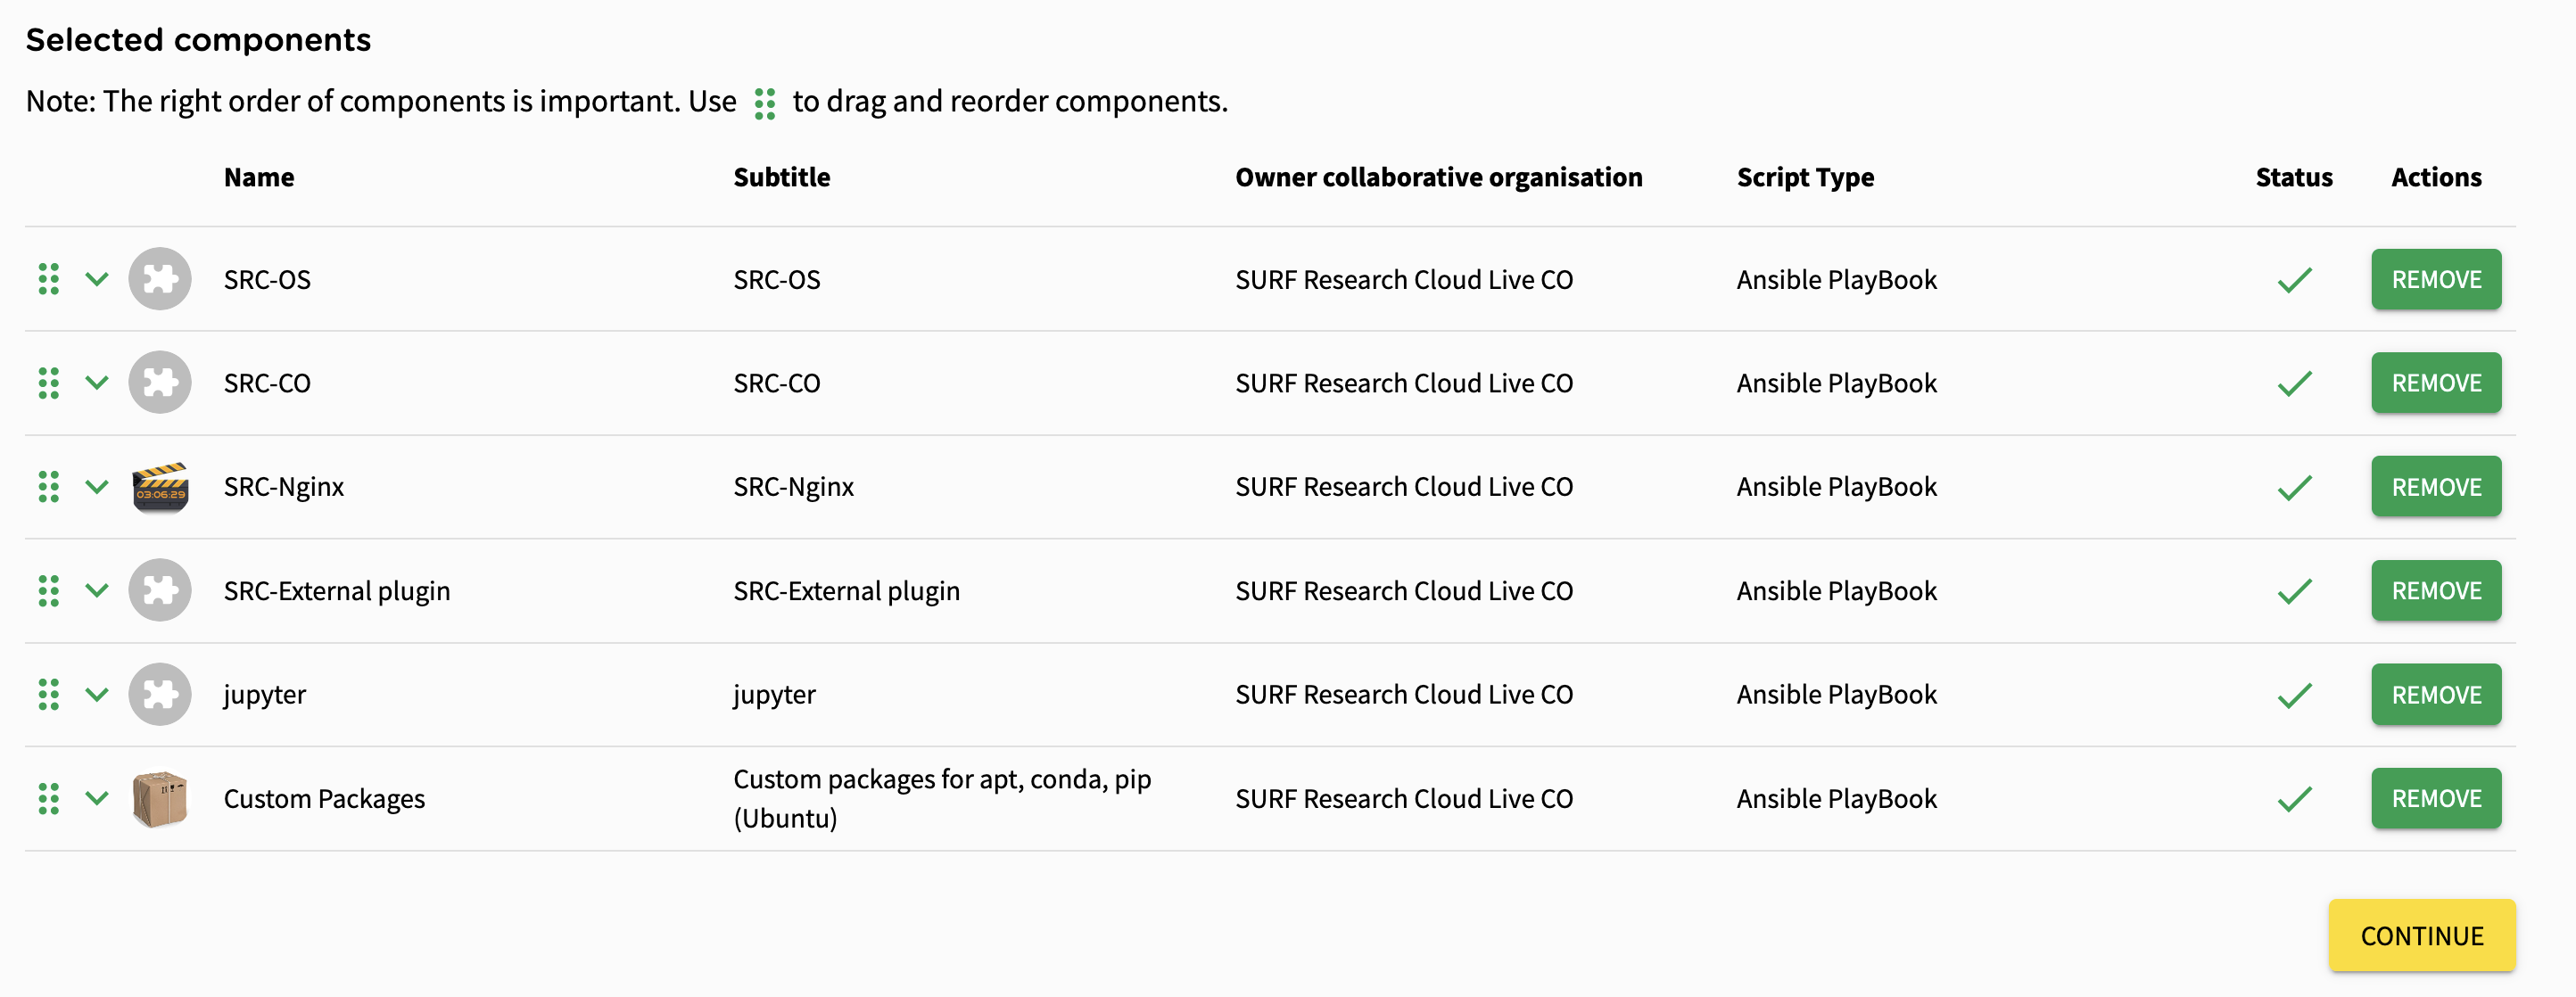
When the list is ready, click the “Continue” button to attach the list to the catalog item.
Frequently used SURF components
In order to get started just inspect the component lists of other catalog items and take over the first few components in your own catalog item. This will give you a solid base to build the catalog item that you need.
- All component lists start with a "SRC[...]OS" component that arranges for particular settings for the operating system. To no surprise, there are different versions of components per operating system. "SRC-OS" is the component for Linux, "SRC-os-windows" is the OS-component for Windows.
- The second component should be one of the "SRC-CO" components. Again, "SRC-CO" and "SRC-CO-Windows" are available.
- If you want to set up a web service with your catalog item you should consider to use the "SRC-Nginx" component that installs nginx with automatically renewed certificates.
- An "SRC-External" component matching the chosen operating system is only required if you want to add non-"SRC" components. The "External" components prepare the workspace for executing the components that have been created by yourself or other users (or some more from SURF). Only the "SRC-*" components can run before the "External" component. The following "External" components are available: "SRC-External plugin" for Linux and "SRC-windows-External plugin" for Windows.
Component versions
A component can have multiple versions (Live, Audited, Development, Pilot). After selecting a component you can select one of the available versions for the chosen component. Note that sometimes only 1 or 2 versions are available.
- Live: the default version. This is how the component is available for other, non-developing users.
- Audited: if available and needed for your process you can select the “audited" (tested or approved) version.
- Development: with this version the component owner can test changes to the component in a catalog item.
- Pilot: with this version a catalog item owner can test the component. (aka "Staging" or "Acceptance")
You can see details about component versioning on this page.
Step 2: Name and describe your catalog item
Name, subtitle, description
In this step, give a clear and descriptive name and subtitle to your catalog item. The description is a good place for the technical prerequisites and other details about the catalog item (for others and for yourself).
Icon
Uploading an image for an icon helps to identify and find your catalog item. You can provide a variety of image formats, max. 100KB, displayed with 40 or 32px.

Step 3: Define owner and support
Catalog item owner collaboration
You can choose from the collaborations that you are a developer in (see also Appoint a collaboration member an admin).
Choose the collaboration that will use the catalog item to be its "home-collaboration".
Support url
Specify where users and developer-colleagues can find information and support.
Support name
The name of a person (or a team) that can help.
Support e-mail address
An e-mail address to send questions and requests to.

Step 4: Choose organizations that can use the catalog item
Choose whether your catalog item will be available for anyone on Research Cloud or just for members of particular collaborations.
You can also choose it to be available to other collaborations “on request”. It means that in the beginning your catalog item will only be available to the allowed collaborative organisations. Members of all other collaborations will see your catalog item’s name and description in their catalog and can request permission to use it.
Step 5: Select cloud provider(s) and settings
On this step, you can choose cloud providers that can be used to run your catalog item. Click on the "+" symbol next to the “Cloud providers” choose relevant could providers from the drop-down menu.

Then select which operating systems and sizes of RAM or GPU are compatible with your catalog item.
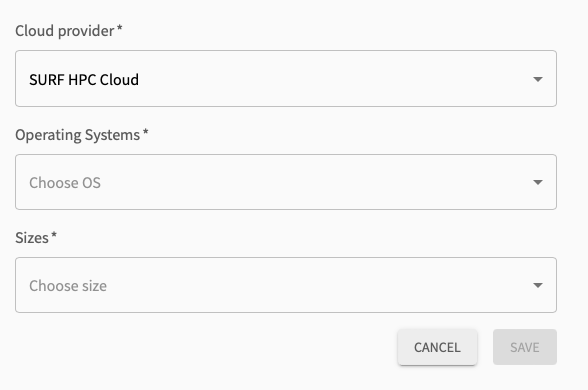
Note, that you can add more than one cloud provider to your catalog item.
Step 6: Choose parameter settings
The use of parameters is explained on an extra page: Using parameters.
On this step you can change overwritable parameters by choosing an action from the drop-down menu on the left.
You do not necessarily need parameters when creating a basic catalog item.

Step 7: Choose workspace settings
On this step you can fill in the properties of your new catalog item:
Boot disk size: size of a disk to which OS will be installed.
Workspace access button behaviour: this field specifies how a workspace with this catalog item can be accessed. A typical choice for a "headless" Linux server catalog item could be "Command line login (ssh:)". A workspace with a desktop could be accessed with "Remote Desktop Protocol (rdp:)". A catalog item with a builtin Nginx server like Jupyter or RStudio typically has a "Webinterface (https:)" access.
Access rules (open ports): in this block you can configure access to and from your catalog item and add extra ports if needed.
By checking the checkbox at "Allow the owner of a workspace to change the security groups rules" you can prevent that the owner of the workspace changes any of the following settings.
To add a rule for a port, click on the "+" symbol next to "Access rules (open ports)":

In the panel that opens, you can specify the following details about a port that you would like to open:
- From port number: start of the port range that will accept packets.
- To port number: end port of the port range that will accept packets. In order to define 1 port choose the same "From port" and "To port".
- IP address(es): Define 1 address or an address range in CIDR format.
- Traffic direction: Select direction "In" or "Out"
- Protocol: Select TCP (Transmission Control Protocol) or UDP (User Datagram Protocol)
- Mutable: whether this setting be changed on a running workspace
When port details are filled in completely, press "SAVE".
Submit
Click on "Submit" to save the new catalog item. Make sure that it now appears in the total list of catalog items and that you can see an "Edit" and a "Delete" icon for it.
You can change all the properties of the catalog item, later on. Just click on its “Actions” icon and select “Edit” in the list.